How to use Snipping Tool To Take Screenshots
How to use Snipping Tool To Take Screenshots
- In Windows 10
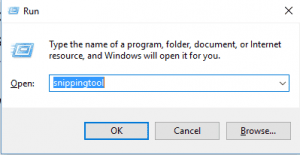
You can find it in the by searching it the Cortana’s search menu or go to All app > Windows Accessories, here you can find a shortcut to snipping tool. Another way to open it by pressing combination of Windows logo key + R key and write “snippingtool” in the tab and press OK. One more way is by going to File Explorer and navigate to “C:WindowsSystem32”. Open the spinning tool from there.

- In Windows 7
As in the windows 10 you can run it by simply searching it in the search menu. Go to start menu and then accessories and then click the spinning tool icon from there to open it. One can use the Open run by pressing windows logo key + R key simultaneously, type “snippingtool” in it and press OK.
- In Windows 8.1
It is just the same as above, you can find it either in start menu or in the Open run by typing “snippingtool” in it. Or by searching it from the search menu. After opening it here is the introduction of its features and buttons.
Intro to its User interface
If you had opened it in the Windows 10 so you’ll find five buttons i.e. New, Mode, Delay, Cancel and Options. Here is the purpose of these buttons.
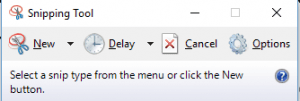
1.New button: it allows to take screenshots. But in the 7 & 8.1 versions it also allows you to choose the type of screenshot you want to take.
2.Mode button: It is only in the windows 10 and it allows you to select the type of the screenshot you want to take. It does the same thing which the new button does in the Windows 7 & 8.1.
Also Check: Best Snipping Tools for Mac
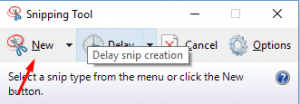
3.Delay button: Its work can be explained by its name, it delays the time of talking the screenshots by 1,2,3,4 or 5 seconds.

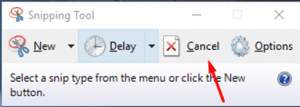
4.Cancel button: it cancels the current command you had given to it.
5.Options button: It allows to customize different aspects of the applications. But in the windows 7 and 8.1 it doesn’t have ode and delays buttons.

Taking screenshots by using spinning tool.
You can take four types of screenshots by using it. In Windows 10 you can choose your desired type in the mode button and in the windows 7 & 8.1 you can select the options by using the new button.
The four types are as follow.
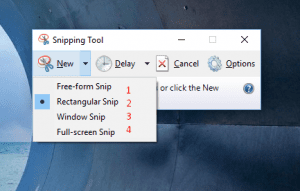
- Free-form Snip: It is used to cut out an irregular line around the desired area to create your shot in freeform. When you dragged the cursor around the desired area it will follow with a red line and after completing, it will save the picture.
- Rectangular Snip: It is used to take screenshots in the rectangular shape, you can drag the cursor to do so.
- Windows Snip: It is used to take screenshots in the internet browser or any dialogue box.
- Full-screen Snip: It take the whole screen’s capture.
- Editing your screenshot
It offers you several options to edit your picture, by using pen and highlighter and the eraser is used to remove any undesired mark created by using the pen or highlighter. To save the snip you must hit the save snip button, choose your location where you want to save it for your future use. You can also choose the file type i.e. PNG, GIF, JPEG or in HTML. You can also email the screenshot by the send snip button but it does send the email to only those clients whosoever are using the desktop email like outlook or thunderbird.
- Customizing the snipping tool
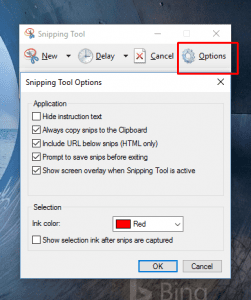
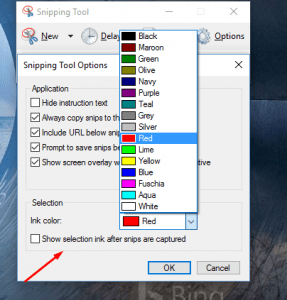
You can change the options and set it to your preferences. Go to the options in the tools menu. Here you can find checkboxes, you can tick to change the feature.
Hide Instruction Text – it hides the instruction text in the main window.
Always copy snips to the Clipboard – It copy all captures to the Windows clipboard.
Include URL below snips– It save your snips as a Single File HTML or MHT documents.
Prompt to save snips before exiting – It gives you heads up if you did not save any captured shot.
Show screen overlay when Snipping Tool – the Snipping Tool transparent overlay is not shown on the screen. If it is disabled.
In the second section. You can change Ink color.