
Blog
pCloud Giveaway
pCloud Giveaway
pCloud Giveaway

pCloud 500GB Giveaway And New Cool Features For Both Android And iOS Users
Cloud storage is becoming a commodity which everyone needs for various reasons, but it does play a crucial role in accessing important files anytime and anywhere without carrying external hard drives or any additional storage devices with you.
You don’t need to have to download documents to view them because cloud storage companies have inbuilt tools, which help you take a quick look at the documents within, so you save time and money as well.
One of the companies, which have evolved over the years in cloud storage category, is pCloud, which faced the toughest competition against Google Drive, Dropbox, and others. And its not only us who prefer pCloud in saving our files online, OnlineBackUP team also prefer it.

The reason, why we have mentioned competitors because the company has worked hard to provide amazing features and services over the years.
pCloud has hit seven million users mark last year, which is a great number and the company is growing bigger and bigger every month, which is why the founders have decided to giveaway premium accounts to the loyal users.
What’s in the giveaway?
1: You get a premium account for a lifetime, so you don’t have to worry about renewal and no limits at all. The complete unlocked full-featured account that can be used till the company exist.
2: The cloud storage you get from the giveaway account is 500GB, so you can use it the way you want, but make sure you do not violate any terms and conditions of the pCloud policy.
3: The number of special users who are going to get to win the full-featured account is three. Each premium account pCloud account is worth $480/Year.
How to enter?
First, go to the official giveaway page

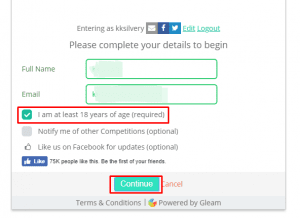
Click on any social media icon to enter. In my case, we have selected “Facebook.”

Now you have to click on Continue, but make sure “you are at least 18 years old.”
Now you have to complete each task one-by-one, we recommend you to post an article about it because it gives you 15 points right-off the bat.
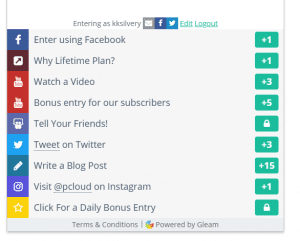
Isn’t that simple? Also come back to this every day, and click on “Daily bonus.”
iPhone TouchID & FaceID Feature Available
The company has recently announced that they have updated the application, where the most anticipated feature of “Touch and Face” id is enabled.
Enabling TouchID and FaceID protection for your important files is easy. If you’ve already enabled TouchID on your phone, the only thing you left to do is to
The protection doubled with the feature, and you can lock and unlock your pCloud account with the help of TouchID and FaceID protection. All your files and documents are locked with the help of your TouchID.
What do we recommend?
If you are reading the news lately regarding the iPhone latest faceID feature, then it can be unlocked by others as well. We recommend you to stick with the TouchID, which has proven to be the better option than face ID.
If you are an iPhone X user, then you have no other choice but to stick with the FaceID or stick with the traditional password protection feature.
Whenever you try to access the documents or files stored in the pCloud, you need to TouchID or FaceID.
Free up space
We are in the generation, where content is generated on a regular basis like photos, media, music, and more. pCloud services becomes more important when you don’t have enough storage to save the files.
the pCloud mobile app has a smart feature, where the app will save photos from your camera roll to pCloud storage account, and once your smartphone camera roll photos saved to the cloud storage, then you are ready to delete the files. Thus saving you plenty of space in your internal storage. The file manager in the pCloud is well-managed, so you don’t have to worry about getting confused.
How to enable Automatic Upload?
Follow the steps we show you.
Step 1: Launch the app and go to settings.

Step 2: Scroll down until you find “Automatic upload.” Tap on it.
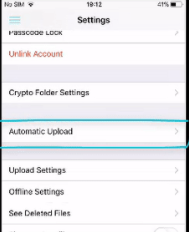
Step 3: Tap on the enable option on your iPhone or iPad.
Now, we have taught you how you can get automatic upload the content to the pCloud storage.
Final Words
If you have any questions or you have the experience to share, then let us know in the comment section below.